


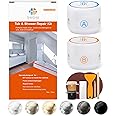
Tub, Tile and Shower Repair Kit (Color Match), 3.7oz Fiberglass Repair Kit, Porcelain Repair Kit White/Almond/Black/Bone/Bisque/Biscuit/Grey/Cream/Off White/Beige, Odorless Bathtub Paint
Details
- MaterialEpoxy Resin
- BrandHT HOMETINKER
- StyleCompact
- Item Weight6.87 Ounces
- Item dimensions L x W x H5.12 x 2.76 x

Description
✨ Repair like a pro, blend like a boss! 🛁
- SAFE FOR YOUR HOME - Odorless, non-toxic formula powered by nanotechnology—safe around kids and pets, so you can repair with peace of mind.
- BUILT TO LAST 5 YEARS - Waterproof and leak-stopping epoxy resin ensures your repairs stay strong and invisible for half a decade.
- EFFORTLESS APPLICATION - Compact gel form and simple glue installation make professional-grade repairs quick and mess-free.
- TAILORED TO YOUR STYLE - Available in 11 on-trend shades from Arctic White to Thunder Grey—blend repairs flawlessly with your bathroom’s vibe.
- FLAWLESS FINISH EVERY TIME - Seamlessly repairs chips, dents, and scratches on porcelain, fiberglass, and more with a perfect color match—no touch-ups required.
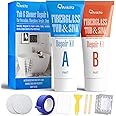
The HT HOMETINKER Tub, Tile and Shower Repair Kit is a 3.7oz epoxy resin fiberglass gel designed for durable, waterproof repairs on porcelain, fiberglass, acrylic, and more. Featuring a perfect color match across 11 shades, it delivers invisible fixes without additional paint. Its non-toxic, odorless nanotech formula ensures safety for families, backed by a 5-year durability guarantee.


Specifications
| Material | Epoxy Resin Fiberglass |
| Brand | HT HOMETINKER |
| Style | Compact |
| Item Weight | 6.87 Ounces |
| Item dimensions L x W x H | 5.12 x 2.76 x 2.36 inches |
| Compatible Material | Porcelain, Fiberglass, Marble |
| Water Resistance Level | Waterproof |
| Item Form | Gel |
| UPC | 760385381896 |
| Unit Count | 1 Count |
| Number of Items | 1 |
| Color | White Biscuit Almond Icegrey Black Dune Linen Bone |
| Surface Recommendation | porcelain tub fiberglass |
| Manufacturer | HomeTinker |
| Part Number | TUB-REPAIR-007 |
| Item Weight | 6.9 ounces |
| Product Dimensions | 5.12 x 2.76 x 2.36 inches |
| Item model number | TUB-REPAIR-007 |
| Is Discontinued By Manufacturer | No |
| Installation Method | Glue |
| Item Package Quantity | 1 |
| Number Of Pieces | 1 |
| Handle Material | Ceramic Acrylic Porcelain |
| Usage | Cured Concrete |
| Batteries Included? | No |
| Batteries Required? | No |
Reviews
W**Y
Good to have a locking outside door.
Good products. Delivered to my front door in a timely manner.
X**S
Overall solid but isn’t as good as advertised!
I was looking for a cost effective way to fix a small crack/ hole in our fiberglass shower and this was an adequate solve. I accidentally dropped our babies bathtub and the plastic chipped the corner of the fiberglass. Overall I was satisfied with the product but I wasn’t in love with the final result. I will say that the epoxy mixture is great, as it did a great job of filling the hole and the hairline fractures! Matching the color was a little tough but I did achieve a close enough warm white that looked close to the rest of the tub. The brown gel goes a long way so please be VERRYY careful when adding the color to the epoxy. Also the color gel is very watery and messy so be carful when opening and closing the lids. I would suggest having some scrap paper in place before opening both the gel and mixture A and B. Mixing the A-B was easy but getting the exact amount was a little tough to eyeball. I also wish the company included an additional wood popsicle stick to ensure you’re not mixing the epoxy compounds. I made sure it was wiped clean before scooping into part B but I still wasn’t 100% sure I used the exact amounts. I highly suggest masking off the area you’re repairing! It helped me big time! I was able to section it off and ensured my coat was even by having the area cleaned and masked off. Another grip that I have is that the instructions said let the epoxy sit for 24 hours but on Amazon and in the tutorial videos provided by the company it said 3-4 hours. This was a bit confusing and I wasn’t sure what time was correct, but letting it sit for a full day seemed to work fine for me. After the epoxy dried and the tape was removed I begun the sanding process, which wasn’t as easy as I thought it would be. If your doing this by hand it will take some time! I ended up using all of my 600 grit sandpaper! It wasn’t the most effective when leveling out the dried epoxy as it took about an hour to get it smooth downed. I cut it into manageable pieces that allowed me to create a make shift guitar pick, which then allowed me to get around the corner and closer to the base of the shower wall. The 1000 grit sandpaper worked magic! I was able to smooth out the rest of the epoxy relatively quickly using it and I used the sample small guitar pick method for sanding it down. Once it was pretty smooth I noticed that the color was a tad bit flat and that the shine from the epoxy coat was completely gone. The brand needs to include polish!!!! I was a bit let down that it wasn’t included and after further reading the instructions they suggest you buy additional polish. So overall it was decent! It did the job, but it WILL NOT be the picture perfect examples that the brand is using. I believe most of the images are photoshopped in all honesty. Overall the actual product is good but if you want a really nice finish on your tub or shower I would suggest buying additional and better sandpaper. I would say start with 500-600 grit, and then go to something in between 700-800, and then finishing with the 100 grit sandpaper. Also make sure you grab some polish to get the shine and luster back to the surface, which I wish was included in the kit. Be careful not to damage the existing surface as it will scratch. Lastly being that I don’t have any home improvement experience or background, I wish the brand had actual tutorials done by professional as that would be great for new users. It would help us understand a step by step process on how to effectively use this product. Again, I think I would be willing to do it again but if you have a lot more damage I would say leave it to the professionals!!! It’s not as easy or as quick as it looks but I’m decently satisfied with the result.
T**S
Versatile. Hard to match colors.
I've used this twice, first to repair a 1cm chip in a fiberglass composite shower, then to patch some chipped tile in a kitchen floor.It works great, but it's genuinely hard to get a color match. In my I was a little not-dark-enough on the first attempt, and a little too-dark-and-too-grey on the second. Both I consider adequate outcomes, as they look 1000% better than they did before. The tile floor shown has about a dozen chips repaired, the largest about 1cm wide.(Side note: if you want to clean grout, mix hydrogen peroxide with baking soda and dish soap. It actually works!)Between the brown and black dyes you have a lot of versatility in matching a color, but it's not at all reproducible. Every attempt is a roll of the dice, you can't save the result for later, and you've permanently used to some of your raw materials.To its credit, the material looks about the same wet as it does cured.I found the consistency when mixed fairly sticky. This is good, as it adheres well to the substrate, but there are downsides. It's hard to flatten it out without making a mess during application. I had my best results using a toothpick.The material cures to the consistency of a very hard polymer. As others have mentioned, sand paper is barely effective in wearing down the material (without power tools), though it does work. I had good results with a Dremel and a barrel grindstone. Takes a light touch, but it was easy to take the bulk of the material off leaving a flat surface.From there it depends how shiny you want it. For my shower I sanded, then used rubbing and polishing compounds to match the existing shine.The tile was trickier, as it was not glossy, but a sort of ceramic eggshell pebble with some color variations. For that I used the Dremel stone to flatten, then some combination of sandpaper and a scotchbrite pad to arrive at an approximate texture. I'm not sure it would be possible to achieve a perfect texture match, but for small repairs, and for most practical purposes, I'm happy.
Common Questions
Trustpilot
3 weeks ago
2 months ago
