🎨 Transform your staining game with precision and speed!
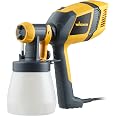
The Wagner Spraytech Control Spray QX2 HVLP Handheld Stain Sprayer delivers professional-grade finishes 2X faster than traditional brushes. Featuring 3 adjustable spray patterns and material flow controls, it ensures smooth, consistent coverage on fences, decks, and outdoor furniture. Lightweight and easy to clean, it’s engineered for efficiency and versatility with a wide range of stains and lacquers.


| Brand | Wagner |
| Color | Yellow |
| Recommended Uses For Product | Painting |
| Material | Plastic |
| Item Weight | 1.54 Kilograms |
| Style | HVLP Stain Sprayer |
| Power Source | ac |
| Included Components | Instruction Guide, Nozzle |
| Model Name | Control Spray |
| UPC | 024964298983 |
| Global Trade Identification Number | 00024964298983 |
| Manufacturer | Wagner Spraytech |
| Part Number | 2419326 |
| Item Weight | 3.39 pounds |
| Product Dimensions | 6.25 x 8 x 11.5 inches |
| Country of Origin | Poland |
| Item model number | 2419326 |
| Size | QX2 |
| Item Package Quantity | 1 |
| Special Features | Low Volume |
| Batteries Required? | No |
M**S
Great Sprayer for the DIYer
I bought this quite awhile back (a little over a year ago), so I have used this item a lot. I now have a more expensive (10X the cost) HVLP rig, but I have found that this little Wagner gun is so MUCH more VERSATILE and EASIER to use, that I use this one more often than the expensive one. I can spray oil-based paints and primers, as well as water-based products, with hardly any effort. Cleaning up is fast and easy, too. You CAN get a 100% perfect, professional finish IF you take your time, read and re-read the manual, and you practice with it, first. Do not expect to pull it out of the box, fill it, spray with it, and have perfect results. I suggest that you gather lots of cardboard and buy a can (quart or gallon) of cheap paint (the same type as your first project requires (water- or oil-based)). Then, buy the appropriate diluent (read the paint can), the compatible additive (i.e., Penetrol for oil-based paints and Floetrol for water-based paints). While you're at the paint store (or you are on Amazon.com) pick up some medium size (pertaining to particle filtration size, not overall size) disposable paint filters. My two spray painting mantras are, "Practice does make perfect!" and "Paint additives can make ALL THE DIFFERENCE IN THE WORLD between a professional-looking paint job, and just an awful looking paint job!" That's it in a nutshell, but I've written at length about the first time I used this sprayer. If what I learned can help you get great results on your first project, it may be worth the time it takes to read:My first project was not the smartest one to choose as a first project to paint with a spray gun. It was the wainscoting and trim in my dining room. But, it came out so perfect, that even after a year, the glassy, smooth, sprayed surfaces still impresses me so much, I cannot believe I did them! But, back then, I didn't know any better, so I thought I would just start right in with the painting, buying the exact same paint and color (Sherwin Williams Alkyd) the installers had used. I lightly sanded all of the wainscoting and trim, as best I could, to scuff up the surfaces. I also used a liquid deglosser, since sanding detailed trim is thankless, tedious work. But, most of all, I spent a lot of time caulking (using PAINTABLE caulk) areas that had pulled apart from "settling," or that were not properly caulked by the installers in the first place. I let the caulk dry thoroughly. Actually, it was all the cracks and crevices in the joined edges of the woodwork caused by improper (or complete lack of) caulking, and some due to settling, that had caused the need to paint the trim and wainscotting.Next, I started in with the viscosity tests. I used paint thinner first, but then I read up on additives. So, I switched to using a combination of paint thinner and Penetrol (by Flood, purchased at Lowes). I can't recall the exact ratio of paint thinner to Penetrol I ended up using, but I think it would be safe to say about half and half. Of course, paint thinner was what my product called for as a thinning agent. Paint additives, like Floetrol and Penetrol, help produce a smooth, glassy finish. The additives can help make up for a multitude of sins! For example, if you did not properly adjust your air/paint flow, you could end up with a painted surface that has an orange peel texture (a common problem). If it's not too bad, the additives themselves can make that problem completely disappear! But, that's not too surprising, because one of their purposes is to reduce, or eliminate, brush marks!Once I had all of my paint thinner and Penetrol added in order to achieve an acceptable viscosity test, I was alarmed at how much I had diluted the paint! I had definitely diluted it beyond what the manufacturer had recommended (as stated on the can). Thankfully, I was worried enough that I decided to practice on some cardboard, rather than on the dining room walls, first, as I had planned on doing after reading all of the positive reviews here, thinking I could just spray the walls and get great results! And, although it didn't take long before I was able to get a nice, smooth coating on the cardboard, I am really thankful I did! I would have been scraping and sanding walls, for sure! I also stood the cardboard up vertically, like the surface I would be spraying (vertical surfaces are much harder to spray without getting drips and runs), so I could get a feel for how much paint I could apply before getting runs. It wasn't very much! I had to keep the gun moving relatively quickly. But, by then, I had to send my husband back to Sherwin-Williams for another can of paint, just to be sure I would have enough paint!Before getting to the viscosity tests, though, I had basically turned my dining room into a giant spray booth, but without an explosion-proof fan mounted in the window! I covered the windows, ceiling, and upper walls with plastic, masking off all of the edges. I also taped plastic over the two doorways, masking around all of the edges of EVERYTHING. I used thick plastic drop cloths on the floor, but I goofed by not taping them down as securely as I should have. So, I had to stop and do some clean-up and remedial taping when I saw that the air coming out of the nozzle was blowing up the edges of the plastic! Naturally, I used a respirator, and was covered head-to-toe in disposable painting attire. The air was thick with paint mist when I did paint. But, I expected that in the enclosed space. I put on a total of four coats, as I thought with all of the diluting, they would be thin coats. They were, but I wouldn't say that was a bad thing! I don't own a mill gauge (something I just recently learned about!), so I couldn't tell you how thick each coat was, but they were thick enough to cover bare wood without being transparent enough to see the wood grain show through, but not so thick that it would cause runs or drips. I always sprayed a small piece of cardboard, leaving it in the dining room, but near the opening, so I could easily check when the paint was dry enough to recoat, without touching the trim or walls themselves. It dried much quicker than I had anticipated, given all of the dilution. I did get a couple of runs, but I just sanded them off when the paint had dried enough to produce a powder when sanded, and not rub or rip. Of course, I sprayed these areas again.Even with the massive amount of prep work required (most of it would have still been required if I was brushing-on the paint, such as all of the caulking), the amount of time It took to spray, clean-up, dry, spray, clean-up, etc., was only a fraction of that time that would have been required for me to brush on all of the coats! The results were, as I said, spectacular. Today, the wainscoting and trim still look as fantastic as they did the day II had finished painting them. I was worried the dilution of the paint would have affected the wear or appearance of the surfaces, but it did not. So, I would never be afraid to dilute paint more than stated by the manufacturer on the can. Not being a paint professional, I do not know how they arrive at those figures, but for myself, I would always dilute the product according to what is recommended in the sprayer manual (using viscosity cup and timing the flow), and not what is stated on the can.But, I always read the can of the product I am using, because it tells me what to use in order to thin the product (the diluent). For oil-based PRIMERS, I use only the recommended diluent or solvent, and I omit the additive (Penetrol). To date, I have not used water-based PRIMERS, but I would probably only use distilled water for the diluent (unless the can stated to use another type of diluent, that isn't water). A shellac-based PRIMER would probably call for denatured alcohol as the diluent. Again, always defer to the can/manufacturer for the diluent to use, but defer to the sprayer manual for the proper dilution rate (using the viscosity cup). For water-based paints, I use a mixture of one part distilled water and one part Floetrol (50-50) to dilute the paint. I also use a medium filter for all paints and primers, and it is the last thing I do before I spray paint. Disposable filters are cheap, so I use a fresh, new filter when I fill or refill my sprayer cup. If I fill the cup three times during a project, I've used three filters. I always gather some cardboard to use to warm-up on, and, most importantly, to help me fine-tune the settings on the sprayer, so that I achieve the best finish possible. If your paint is properly diluted, and your spray is properly adjusted, I just don't think you will be ever be unhappy with the results. Thoroughly cleaning up your equipment as soon as you are finished painting is also extremely important. If you have a tiny, dried, speck of paint in the nozzle, you will not get good results. I have found those really thick pipe cleaners (oh, excuse me, I mean CHENILLE STEMS) are invaluable as an aid to cleaning out the inside of the slanted plastic tube that is inserted into the paint cup.Some other tips I've learned include spray painting early in the morning, when there is less likely to be a breeze, if I am painting something outside. Avoid spraying in direct sunlight, too. Finally, if there is a result that is not to your liking, Google it to find a solution to the problem. I have learned so much from doing this, and watching Youtube videos, too. If all else fails, call the manufacturer because there is always a small chance you could have a defective part that needs to be replaced.Dilute and practice with your cheap practice paint. If you can achieve a great finish on your cardboard (make sure the cardboard has a smooth surface to begin with, too!) using your cheap paint, you will surely be able to get an amazing finish with your higher quality paints and finishes.
T**G
GREAT SPRAYER FOR SENIORS
I am older senior and not machine savvy, but this sprayer was easy to assemble, worked like a charm on a 25 foot section of fence. Nice coverage. You don't get too far on one full bottle, but I specifically wanted a smaller bottle as i can't lift heavy items as my arm and hands tire easily, but no problems with this sprayer. Cleanup is messy, suggest you have a small dishpan ready and just pour the mineral spirits (or whatever you clean with) into the pan and put parts in there. That makes it pretty quick. I was concerned it would be a dud but it turned out great and good value for the money.
C**8
You can get cabinet-grade results with this gun and water-based products in your garage, but...
Quick summary, since this will be a long review: you can get excellent results for furniture and cabinetry spraying water-based paint with this system, but don't bother with latex, Floetrol, Benjamin Moore Advance, or any of that other nonsense you'll see on the refinishing and remodeling blogs. Use the Sherwin Williams Kem Aqua Plus water-based system. This product can only be bought at SW commercial stores but they're happy to sell it to non-professionals. It's amazing stuff but sadly almost nobody at Sherwin Williams seems to know about it.Read on for the details! I've divided my review up into the backstory on why latex paints are awful for cabinetry, the solution, my review of this Wagner gun, and the tools and techniques I use to spray with this gun to get fast, fabulous results. Feel free to jump around the review as you see fit.=== FIRST, THE BACKSTORYAfter getting quotes for $6,000 from professional carpenters to have a built-in storage bed installed in my three-year old son's room, I decided I could buy all the tools and do it myself, and would have to screw up about nine beds before I got anywhere close to that much money. A built-in was the best use of space for his room and I was kind of excited to build something for him.Three months of weekend work later, the bed cabinetry was finished and it was time to paint the frame. Now the problems began.1. Everything I read on refinishing blogs told me I needed to spray the paint for the cabinet-grade results I desired. Brush and roller were a non-starter2. I'm a hobbyist and not set up for professional results or spraying solvent-based finishes in my garage3. I didn't want to spend a fortune on spray finishing equipment, but I did want to learn how to spray finish furniture. After my son's room we have three bathrooms and a kitchen to remodel, and money doesn't grow on trees.So, a bit more reading later, and it looked like I was going to need an HVLP gun and would be spraying latex paint.The Wagner Controlspray Max system came highly recommended from a few sources including the Amazon reviews, so I ordered it. HVLP gun done - so what about the water-based latex paint? I got nothing but inconsistency from the blogs.People seemed to be divided into two camps: those who loved Sherwin Williams (hencforth SW) ProClassic Waterbourne Acrylic Alkyd and those who loved Benjamin Moore Advance. I spent more time than I'd like to admit researching opinions on the two from hobbyists and pros alike, but it became obvious that a lot of folks spraying any kind of latex often ended up with the paint being easily marred or chipped off due to the latex being softer than solvent-based paints once cured. I also learned that water-based paints take over a month to cure. Are you kidding me? A month? Between primer, color coat, and top coat I was looking at around two months for it all to cure. Not yet knowing any better way, I accepted my fate - it was either that or blow up my garage spraying solvents, and I kind of like my garage in one piece.So, BM Advance or SW ProClassic? We have a SW store nearby and the BM store is always closed on Saturday, and since we'd had great results with SW's Duration latex on our walls, I went with the SW ProClassic Waterbourne. Then came the process of learning how to thin and spray latex.Since I'm a perfectionist, this process consumed my weekends on and off for the next four months of my life.To set the stage: the Wagner Controlspray Max **will** spray latex unthinned, but not with good results. You'll get an orange-peely mess. As it turns out, there aren't many spray guns (even professional ones) that will give you a good finish with unthinned latex; you just have to thin it. Unthinned water-based paints and primers not designed for spraying that I tested take over four minutes to drain the viscosity cup that comes with this Wagner HVLP, but in my experience, this gun really can't give you a nice flat finish using any liquid that takes more than about a minute to drain the viscosity cup.It's at this juncture that I implore you to accept a fact that I learned the hard way: if you plan to shoot latex with this HVLP system, know that you must thin it. Know also that every latex paint thins and lays down differently in response to what you did with it, and what you do to the chemistry of the paint via thinning and additives you mix with it will affect the finish and adhesion/durability of the paint in ways you can't anticipate until you try out your mix and let it cure. FOR THIRTY DAYS. And if you're using primer and clear coat (which you probably are), guess what? You have to figure this out three times in a row - and pray that the products you choose for each stage are compatible with each other, and that you won't find out about compatibility issues weeks or months after you thought you were done painting and installed your project.But, surely all these people refinishing their kitchens on blogs online will give you the perfect recipe for thinning the paint they used, right? Nope. One of the most annoying things about many of the refinishing blogs is that the most common level of detail seems to be "I REDID MY CABINETS, I BOUGHT AN HVLP SPRAYER, I USED BM ADVANCE, I PUT SOME FLOETROL IN IT, IT'S AWESOME, LOOK HOW GREAT MY CABINETS CAME OUT!" The authors of these articles provided zero detail on anything that mattered to me. What ratios they used to mix the paint and additives? What conditions they were spraying under/ How long did they wait between coats? Did they let the stuff cure for 30 days or wing it? How many coats did they apply? How long did they waitfor the paint to cure before applying a topcoat? How durable was the finish six months to a year later? And so on. The last item about durability is particularly important when you're either (a) building a storage bed for a toddler, or (b) refinishing kitchen cabinets, since either of the aforementioned use cases are about the harshest environments into which you can put an unsuspecting piece of furniture.Long story short: I went through three different formulations with the SW ProClassic WB based on things I gathered online, including Amazon reviews about this gun. The formulations involved varying combinations and ratios of paint, water, Floetrol, windshield washer fluid, and water-based polyurethane. In the end, the best recipes I came up with for latex-based products were as follows (remember that I TOTALLY ADVISE AGAINST USING LATEX PAINTS, as we'll get to in a second, but here are the recipes for posterity's sake):- Primer: 4:1 Zinsser Bulls Eye 1-2-3:water plus a cup of Floetrol per gallon of mixture (around 60-70 seconds runout time in the Wagner viscosity cup)- Paint: 12:2:3 SW ProClassic WB:water:Floetrol (around 50-60 seconds runout time in the Wagner viscosity cup)- Clear Coat: unthinned General Finishes High Performance Waterbourne Polyurethane (flat gloss, around 42 seconds runout in Wagner viscosity cup)These mixtures sprayed well, laid flat, and produced a passable result much better than I'd ever get with a brush. Unfortunately the GF needs to be laid down in about three coats or more to get hard, and it seemed to change the color of the paint beneath it every so slightly (to kind of a slightly yellower version) even though it's supposed to be totally clear.My main beef with these mixtures, and pretty much any case where I thinned water-based products, is that they takes forever to cure, and when they are done curing they are not that hard/durable. Certainly nowhere near durable enough to withstand daily kitchen use, or my son bashing a garbage truck against the surface for three hours straight. My test for hardness is my version of the "nail test," i.e. scratch the crap out of the surface with your fingernail or thumbnail while pressing hard and seeing if you can get the finish to mar or come off. Prior to the paint going on it, the Zinsser mix was actually nail-test hard. The 12:2:3 SW ProClassic mixture would not scratch off the wood or primer, but it would degloss, and the scratches were visible if looking at the finish sidelong (picky perhaps, but hey - I said I was a bit of a perfectionist). Once the General Finishes Poly went on it was very hard to degloss with a good scratch, but it was still possible to do so. And here I was thinking that polyurethane was supposed to be darn near indestructible.Worst of all, the GF poly would blush in spots as it cured (get a slightly milky look) and get little pock marks at places in the finish, almost like acne. After going back and forth with GF customer service, they decided that it was not my technique nor environment. They believed that their product was likely not completely compatible with the SW paint. Fantastic.=== SECOND, THE SOLUTIONSo if all this has you worried abouy buying this Wagner and refinishing your cabinets in your garage, fear not! Because there is a solution. It's a water-based finishing system sold by Sherwin Williams, and it's called Kem Aqua Plus.In my attempt to understand why it took me four months to come across this stuff, I have tried to reproduce the steps that led me to find KA+ in the first place. I haven't been able to, but I believe I Googled for water-based lacquers and landed on an article by bloggingpainters.com. And boy oh boy, I thank my lucky stars that I did.Kem Aqua Plus (henceforth KA+) is a finishing system that is rated by the Kitchen Cabinet Manufacturers Association (KCMA). This means that it's been designed and tested to be used on kitchen cabinets, and the guys who say you can use something on kitchen cabinets say that KA+ can, in fact, be used on kitchen cabinets.Note that I didn't call KA+ a paint, I called it a finishing system. The system includes a primer called KA+ Surfacer, a paint called KA+ White (although they can tint it to most of SW's color wheel), and an optional clear top coat called KA+ Clear. Because it's a system, all the products work together flawlessly.All KA+ products are designed to be sprayed right out of the can without thinning, additives, or any of that nonsense. No messing around. No guesswork. Just pour and spray. It's also very easy to clean out of the Wagner gun. You don't even need soap, just plain old H2O.KA+ is so durable that the product literature describes the clear top coat is totally optional. And if you get each coat of KA+ on to your project properly, you only need one coat of Surfacer and one coat of tinted White for the paint to be ready for use.If that's not good enough for you, you picky person you, I've saved the best for last. Remember that SW ProClassic and BM Advance debate, or the cabinet refinishing blog post you read online? They usually ends in somebody lamenting the fact that the stupid paints take 30 days to cure, and aren't even that hard/durable after curing completes. Well, get this: all the KA+ products are dry and ready for sanding/recoat in 30 minutes. 30 FRICKING MINUTES. And when you sand KA+ after 30 minutes of drying, it comes off beautifully and evenly like confectioner's sugar, not in little rubbery gummy shreds that all stick together like when you sand latex paint. After curing overnight, KA+ is ready for the items it has been applied to to be packed and shipped, installed in a kitchen, and barfed all over by your dog - so you can spray it on Saturday and install your cabinet doors on Sunday. Take that, stupid latex.Since KA+ is clearly unicorn paint it must cost a fortune, right? Wrong! KA+ is only $50/gallon. Compare that to the $80 you'd spend on a gallon of SW ProClassic or BM Advance.Obviously, KA+ is made for cabinet-making pros who want to quickly crank out KCMA-rated painted cabinets but either (a) don't want to buy explosion-proof fans to spray solvent-based finishes, and/or (b) have customers or state laws that prevent them from installing cabinets with solvent-based finishes. My guess is that this is why you can only buy KA+ through SW Commercial stores, who by the way know infinitely more about spray finishing than both the SW home stores and SW corporate tech support, both of whom gave me much of the misinformation about spraying latex paints that led me to waste so much time screwing around with them, and neither of whom ever mentioned this amazing KA+ product which fit my needs perfectly. I'll be writing SW to ask them exactly why this is, since there seems to be a big miss here.=== THIRD, MY REVIEW OF THE WAGNER CONTROLSPRAY MAXOk, so you've made it this far (or were smart enough to skip the preamble). What you really want to know is: is this Wagner HVLP any good for getting cabinet-grade results, and if so, how do I achieve them?First, let's talk about the Wagner ControlSpray Max. I have never owned any other HVLP system, but I really like this Wagner system for the money. In retrospect with what I know now about spray finishing, I kind of wish I had bought an Earlex 5500 or a Fuji Semi-Pro 2 or Fuji Mini Mite 3, but the former two are $399 and the latter north of $600, so considering the Wagner is ~$130 and the results I've gotten from it are good enough to satisfy my perfectionist nature, I certainly don't regret the purchase of the Wagner.I will go over my methodology for getting the best out of this gun in a second, but I can summarize the pros and cons of the gun as follows.First, the pros: the Wagner system is incredibly easy to set up, use, and clean. It will spray a wide variety of material viscosities with results a hobbyist can be proud of. It's cheap, as are its replacement parts. Wagner customer service is prompt and helpful. The hose is long and sturdy, the turbine is powerful enough for the system and no louder than a vacuum cleaner, and you can vary the pressure to meet your finish's atomization requirements. It comes with several cups, which you will need (more on this shortly). And I really like the quick-release hose-to-gun fitting.The cons: it comes with a gun whose nozzle size is fixed and cannot be changed (I measured the nozzle with a digital caliper and it's around 2mm). One of the things I learned about spray finish through research and experience is that when it comes to atomization, the most essential quality of finish existing a gun in order to get a good result, nozzle size matters. Paint manufacturers recommend nozzles for their products, but you can't do anything with that info with the Wagner since it has one nozzle size. The other guns I mentioned all have the option to interchange one nozzle/needle set for another. Wagner does sell a Detail Finish Nozzle gun (Wagner Model #0529013) that works with the Control Spray Max turbine and has a smaller nozzle (around 1.6mm), but you have to buy the entire gun, and as far as I know this is the only other option for this system. On the plus side, the Detail Finish Nozzle is only about $30 and includes an extra paint cup - the other systems I mentioned charge more than that for the nozzle alone. With the Wagner's fixed nozzle, your only controls for adjusting atomization are paint volume and pressure, which you can use to get good results, but not having the ability to select your desired nozzle size is one strike against you if you're shooting for the best possible finish. Finally, the clear plastic cup that commes with the gun is kind of huge and I kept banging it into the surface I had just sprayed whe spraying furniture. I think this big cup is designed for holding a ton of material for when you're spraying finish on a fence or deck or whatever. Size-wise, I much preferred the metal cup that also comes with the gun, although it's not coated with teflon or anything on the inside and I was always irrationally concerned about the interior metal reacting with my paints. Wagner will sell you a plastic cup that is similar size to the metal cup; it's the one that comes with the Detailed Finish Nozzle. The other annoying thing about the cups is that Wagner doesn't sell lids for them. Ball jar lid tops (like those used for canning, sold in most grocery stores) fit the top of the Wagner cups, but the Ball jar threads don't match the Wagner cups well enough to seal them shut, so you have to use masking-tape to make the lids stay on. I bought some Ball jar lids to attempt this, but it didn't work so well, so I just clean out the paint from the cup after each spraying session. I also like to stir the paint as much as possible before spraying, which means I had to filter the paint again in case any contaminants got in from the stir stick, so keeping the paint in the jar became less of a priority anyway.The missing needle swap capability and cup issues are what make me rate this a 4/5. But again, for the money, you really can't complain.=== FOURTH, MY TECHNIQUE FOR GETTING CABINET-QUALITY RESULTS IN YOUR GARAGEI've come up with a system and set of tools that I find works really well with this gun and for spraying water-based paints in a garage, so I'll list it all out here. I'll assume you already have your wood-based project ready to spray.First off, some things to buy. The absolute number first item is Jeff Jewitt's "Spray Finishing Made Simple". Make sure you get the DVD with the book. While the book is an excellent quick reference for the contents of the DVD, watching a professional spraying finish taught me a great deal. Literally, the price of this book was justified by the ten seconds when I got to see Jeff's arm moving with the gun. Watch this DVD before you start spraying. In fact, I'd strongly recommend that you buy this book/watch the DVD before you even buy this Wagner HVLP system you're considering; after you learn more about spraying, you might decide to spend more on another system.Once you've done that, here's the rest of the things to buy:- This Wagner ControlSpray Max HVLP system or some other HVLP gun of your choosing- One Shur-Line Paint Can Lid for every gallon of paint you buy (Model # 1783844), which makes pouring paint into the spray cups as close to "not messy" as it can get. Less than $3 each- DeVilbiss 802351 190 Micron Fine Nylon Paint Strainer, Box of 100 sold right here on Amazon for about $15 (Amazon ASIN B001UFQBAM).- Pipe Cleaning Brush - Tobacco, Glass, Smoke, - Heavy Duty Cleaner with Stainless Steel Handle (Amazon ASIN B00BXU6E8I) - this is for cleaning your Wagner nozzle, aircap, and paint tube. Under $3- A soft nylon-bristle brush with a long handle, like you'd use for washing your dishes. Never use brass-bristle brushes; the Wagner is all plastic and brass will scratch the parts making them collect paint and thus harder to clean later on, while probably also compromising your spraying results. I ruined the aircap and nozzle that came with my Wagner trying to remove stuck-on primer with a brass brush; luckily, the replacement parts were cheap- Abranet Assortment Pack. These are mesh sanding pads, very easy to clean and won't gum up (Amazon ASIN B001BL1R2C). About $25- Rockler hand sanding pads that take round sanding disks (listed as "Sanding Pads" on their web site, item #26381). Pricey at $23 or so, but worth every penny- Rockler Micro Fiber Reusable Dry Tack Cloth (item #27984). Much better than disposable waxed tack cloths in every way. About $9- A cheap empty 5-gallon bucket with a lid- A super fine grit sanding-grade woven pad (akin to a Scotchpad but very high grit, like 800- to 1000-grit). Rockler sells a pack of "Extra Fine Synthetic Finishing Pads, 3-Pack" for about $7 (the white ones) and I like these a lot- (optional) 20" high velocity floor fan or similar. About $45 at a big box store- (optional) Rockler Bench Cookies. These make great stands for your project, especially face frames. I use these with the risers, which I mounted on scrap 2x4 blocks by drilling a 1/4" hole into them. I tried Painter's Triangles and they left little marks in everything. The Bench Cookies have soft pads and don't mar the surface- Go to your local SW Commercial store and buy the KA+ Surfacer, the KA+ White tinted to your color preference, and (optionally) the KA+ Clear topcoat in the gloss level of your choosing. Note that they only seem to sell the Clear in Flat gloss in 5-gal drums, but the Medium is sold in gallons and is somewhere between satin and semi-gloss in terms of gloss level; I wanted flat but the medium didn't offend me. The KA+ product sheet and SW store may advise you to buy a noxious chemical call Butyl Cellosolve for cleaning your spray gun, but this product was not necessary in my experience.TECHNIQUEThese instructions assume you are using the SW KA+ finishing system, but they work just as well for any other water-based finish. They also assume you've practised with tinted water on cardboard or some other medium and have a good feel for the Wagner gun before starting.1. Set up a space in your garage for getting your gun ready. The night before you spray, take all the products you plan to spray into your garage and let them acclimative to the temperature of your garage wel ahead of spraying2. For unfinished wood projects, wet down all surfaces with a cloth to raise the grain and give it 45 mins to dry. Then sand your project as you see fit. For wood, I like to use 120-grit in an orbital sander followed by 220-grit until it feels smooth under my fingers, using a combination of power tools and the Rockler sanding block. Wipe your project down with the microfiber tack cloth.3. Before spraying, fill the non-garbage disposal side of your kitchen sink (or a utility sink if you have one) with enough water to comfortably immerse all the parts of the Wagner spray gun. Don't use any soap; residue can get inside the gun, and then into the paint as you spray it which will ruin your finish. Soap isn't necessary for cleaning off any of the KA+ products.4. Whichever cup from the Wagner that you're NOT using to spray with, fill it up with clean water. You'll use this to clean your gun when you're done spraying.5. Take your Wagner gun into the garage. Open your phone and make a note about the temperature and relative humidity at the time you're spraying. Stir the finish you're spraying with a stirring stick and viscosity-test the paint with the Wagner vicosity cup. Note the runout time along with the weather details; if you start getting inconsistent results between spraying sessions you'll want to refer back to these details to help debug the issue. For reference, all of the following measurements were made with the little Wagner viscosity cup in Orlando, FL during summer conditions (70-90 degrees Fahrenheit and 40% - 70% reltive humidity): KA+ Surfacer is typically 30-40 seconds, KA+ White is 50-60 seconds, KA+ Clear Medium Gloss is 35-40 seconds.6. Remove the cup from the gun. Put a fine paint strainer on the cup. Pour an appropriate amount of finish into the cup using the Shur-Line lid. Make sure you open the relief valve on the back of the lid while pouring, or the paint will glug. Throw away the filter. Screw the gun back on to the cup. Have a paper towel handy; all the KA+ finishes are thin and tend to run a drip down the funnel on the lid.7. Put your empty 5-gallon bucket a fair distance away from your project. I like to put mine on the driveway or the grass in my yard. You'll need it for rinsing out your gun.8. Set up your gun and turbine for volume and pressure respectively, and write down your settings alongside the weather and viscosity details in case you need to refer to them later. Pressure is set using the little wheel on the turbine. In terms of volume, the best way I've found to record my settings on the Wagner is to screw the volume control all the way up so that it reaches the back of the trigger and can go no further (maximum volume). I then back it off one turn at a time while counting the revolutions. I'll then jot down the volume setting as "-6" for example, which means six complete negative rotations away from full volume. I put a little piece of masking tape on the yellow volume screw wheel behind the trigger to help count rotations accurately, and it has yet to wash off. I find that once you've wound it back seven revolutions to -7, no paint typically comes out of the gun. I spray all the KA+ products at maximum pressure and -6 volume. The small aperture for the paint to escape through and high volume produce a bit of overspray, but they allow the product to atomize really well.9. Hook the gun up to the turbine. Test spraying on an easel, or (as I like to do) using the interior side of a big old cardboard box. Tweak the pressure and volume if need be. Once the finish is coming out the way you want it, spray your project using the techniques you learned from "Spray Finishing Made Simple." Note that all water-based finishes appear to have some orange peel when they initially lay down. This will cause you to think that you've botched it. Don't freak out. This is due to the fact that the water in the finish creates surface tension. Water-based finishes designed for spraying have levelers in them to reduce this orange peel during drying. If you aren't using KA+ and are using latex that was not designed for spraying, then this is what the Floetrol is supposed to help with (in exchange for changing the chemistry of the paint and reducing the gloss level). Since KA+ is designed for spraying, you don't need any additives, and if sprayed properly, it lays out great as it dries. KA+ is thin and will run, so don't overdo it; you can always lay on another coat, and soon, since KA+ dries so fast.10. When you're done spraying, remove the air hose from the nozzle. Remove the gun from the paint cup and hold the paint tube over the cup to drain the paint from the gun. Pointing the HVLP gun upward at a 30- to 45-degree angle to prevent paint running out the nozzle, pull the trigger; this opens the nozzle and removes the vacuum inside the gun. As a result, you should see the paint flowing out the paint tube faster. Once the paint has run out to the point where there are only drips, release the trigger and screw the HVLP gun on to the cup full of water you had at the ready.11. Set the pressure on the turbine to the minimum, and raise the volume on the gun to the maximum. Hook the turbine back up to the gun and turn it on. Walk outside to your 5-gallon bucket. Point the gun directy at the bottom of the bucket, with the nozzle up against the edge of the bucket closest to where you are standing to shield you from the spray. Spray until the water runs clear.12. Pour the unused paint remaining in the other cup back into the can. Remove the HVLP gun from the turbine hose and take the HVLP gun and paint cup over to your cleanup sink. With the faucet over the garbage disposal side, turn on the cold water at the sink. Remove and rinse all parts from the HVLP gun, dropping each of them into the sink full of water to soak before you gently scrub them. Start with the cup that was previously full of paint first since the paint will have started to dry. After the paint cup is rinsed and soaking in the sink full of water, release the pressure from the HVLP gun by removing the top from the cup full of water you used to clean the gun. Rinse out the HVLP spray gun by running water through the hole in the bottom while holding the trigger; this also cleans the nozzle and air cap some more. Then remove and rinse out the air cap, nozzle, and paint tube. Grab your soft nylon bristle brush and pipe cleaner, and one by one, clean all the parts of the gun thoroughly, then rinse them in clean water. I like to lay all the parts out on the kitchen counter over some stacked paper towels to dry.13. Enjoy the tasty beverage of your choosing before returning to the garage 30 mins after you laid down the product with your gun. I find the KA+ is drying in sections before I even get back into the house to clean my gun, and is usually dry or pretty close to it after about 30 mins (even on a very humid day). I've usually waited 45 mins to an hour just to be safe, but it typically looks and feels dry right around the 30-min mark.14. When the paint is dry, don the same filter mask you used to spray your paint, and begin sanding. Using your Rockler hand sander with an Abranet pad at 220-grit or higher, and almost no pressure at all, run the sandpaper over the dry KA+ almost like you're polishing the project, but again, very light pressure. The paint sands off like fine confectioner's sugar so you might need to mop up the sanding dust periodically to really feel the finish with your fingertips. Stop sanding once smooth. Be careful not to take the paint off the corners. I found that KA+ held on to the surface much better than latex for sanding between coats; I really had to try to take it off with the sandpaper. If you have any drips or runs, wrap a small piece of sandpaper around your finger and gently sand them out. If you try to do this with latex, it gets very rubbery and the results are not good; usually you have to sand down and recoat. With the KA+ I have successfully removed drips without having to strip an entire section and start over.15. Repeating all the aforementioned steps, lay down multiple coats, staying within the guidelines on the KA+ product sheet. I've had good results with two coats of Surfacer, two of White, and one of Clear. When done with the final coat of White or Clear, remember that you won't be sanding. I like to go over my last coat with a Rockler white synthetic finishing pad to polish it a bit, which feels like it has a grit rating of 800-1000.16. Leave your project for two days. Come back, give it the nail test, and be both amazed and thankful that you never had to mess around with non-KCMA rated paints that weren't designed for painting in the first place
Trustpilot
2 weeks ago
1 month ago